 (Image via
Your gaming PC deserves better than being held back by overheating components or the roar of loud fans. For many PC enthusiasts, liquid cooling represents the pinnacle of performance and style in thermal management. But what exactly is liquid cooling, and is it the right choice for your rig? Whether you're chasing more performance, less noise, or a clean aesthetic for your build, this guide has you covered.
We’ll break down the essentials of liquid cooling, compare it to air cooling, and offer tips to help you decide if it’s the right solution for your gaming setup.
What Is Liquid Cooling and How Does It Work?
At its core, liquid cooling involves transferring heat away from your CPU (and sometimes your GPU) using a liquid coolant. Unlike air cooling, which uses fans and heatsinks to dissipate heat into the surrounding air, liquid cooling relies on a closed-loop system to efficiently move heat away from components.
How Liquid Cooling Systems Work:
- Coolant Circulation: A pump pushes liquid coolant through tubes connected to a water block placed on your CPU or GPU.
- Heat Transfer: The heat from the component is transferred to the coolant via the water block.
- Radiator Dissipation: The heated coolant flows to a radiator, where fans cool it before recirculating it back into the loop.
- Continuous Flow: This process repeats continuously, maintaining optimal temperatures even under heavy workloads.
Liquid cooling systems come in two main types:
- Closed-Loop Systems (AIOs): Pre-assembled and sealed, these are ready to use out of the box. All-in-one (AIO) coolers are low-maintenance and ideal for most gamers.
- Custom Loops: These are fully customizable setups where you choose each component, from the water block to tubing and coolant. They offer more control but require a significant amount of planning and skill.
The Benefits of Liquid Cooling
If air cooling works perfectly fine for many builds, why should you consider liquid cooling? Here’s what makes it such an appealing option for gamers and PC enthusiasts alike.
Superior Cooling Performance:
Liquid conducts heat far better than air, making liquid cooling systems more efficient at keeping CPUs and GPUs at lower temperatures. This is especially useful for overclocking, where pushing your components to their limits generates extra heat.
Low Noise Levels:
Unlike bulky air coolers with multiple fans at high RPMs, liquid cooling systems can do their job with just a couple of fans running at lower speeds. This results in quieter operation, which is a boon for gamers who value an immersive experience.
Aesthetic Appeal:
Nothing beats the sleek, futuristic look of a liquid-cooled PC. Custom loops, in particular, allow for vibrant RGB lighting and colored coolants, turning your gaming rig into a showstopper.
Space Efficiency Inside the Case:
Some air coolers, especially high-performance ones, are enormous and may block RAM slots or other components. Liquid coolers free up space around your motherboard by transferring heat directly to an external radiator.
Comparing Liquid Cooling to Air Cooling
While liquid cooling has numerous advantages, it’s not the perfect solution for every gamer. Air cooling still holds its ground as the go-to choice for many builds. Here’s how the two stack up.
1. Cooling Performance
- Liquid Cooling: Superior performance for high-powered CPUs, overclocking, and maintaining stable temperatures over long gaming sessions.
- Air Cooling: Adequate for most casual gaming setups, although high temperatures may limit performance in demanding tasks.
2. Price
- Liquid Cooling: Higher upfront costs. A good AIO cooler starts at $80, while custom loops can exceed $300.
- Air Cooling: Budget-friendly, with entry-level coolers starting as low as $20 and high-end ones at $70-$100.
3. Installation Difficulty
- Liquid Cooling: AIOs are fairly easy to install, but custom loops require extensive planning, modifications, and expertise.
- Air Cooling: Simple to install, requiring only a heatsink, fan, and some thermal paste.
4. Maintenance
- Liquid Cooling: Higher maintenance, especially for custom loops. Cleaning radiators, replacing coolant, and ensuring no leaks takes effort over time.
- Air Cooling: Virtually no maintenance beyond clearing dust from the fans and heatsink.
5. Durability and Longevity
- Liquid Cooling: Over time, pumps or seals may wear down, and leaks are a potential (albeit rare) risk.
- Air Cooling: Reliable and long-lasting, with fewer moving parts that might fail.
Verdict:
Air cooling is the better option for budget builds or for gamers who don’t want to spend much time on maintenance. Liquid cooling shines when you need better thermal management, quieter operation, or visual flair.
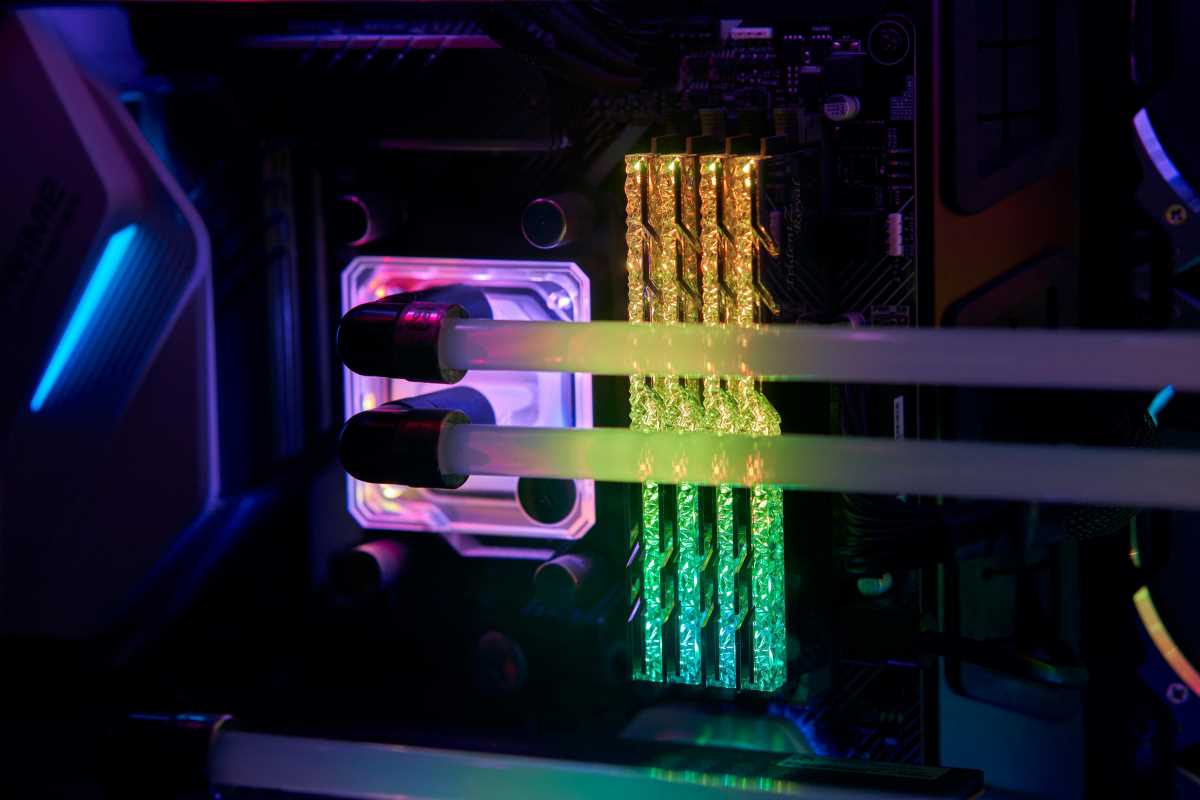
Components of a Liquid Cooling Setup
If you’re ready to make the jump into liquid cooling, here’s what you’ll need to know about the essential components of a system.
- Water Block: The piece that attaches to the CPU or GPU, transferring heat to the coolant.
- Radiator: Dissipates the heat from the coolant. Radiators come in different sizes (120mm, 240mm, 360mm), with larger ones providing more cooling power.
- Pump: Circulates the coolant throughout the loop.
- Tubing: Connects all the components. Tubing options include flexible rubber or rigid acrylic for custom loops.
- Coolant: The liquid that flows through the system. Coolants come in various colors with optional additives to prevent corrosion or algae growth.
- Fans: Mounted on the radiator to help cool the system faster.
If you’re opting for an AIO cooler, all of these components come pre-assembled. For custom loops, you’ll need to purchase individual parts and assemble the loop yourself.
Key Considerations Before Installing Liquid Cooling
Liquid cooling isn’t for everyone. Here are a few factors to keep in mind before you commit.
1. Is It Worth the Cost?
Liquid cooling adds a premium to your build cost, so you need to determine if it’s worth the investment for your hardware. If you’re not overclocking or pushing top-tier components, air cooling might be sufficient.
2. Case Compatibility
Not all PC cases are designed to support radiators or liquid cooling setups. Check your case’s specifications to ensure it can fit the radiator size you’re planning to use.
3. Maintenance Commitment
AIO systems require minimal upkeep, but custom loops involve periodic cleaning, coolant replacements, and ensuring everything is sealed properly.
4. Risk of Leaks
While modern liquid cooling systems are highly reliable, there’s always a minor risk of leaks. Make sure you prioritize quality parts and follow installation instructions carefully.
5. Skill Level
Opt for an AIO cooler if you’re not comfortable building custom loops. They offer much of the performance without the complexity.
Tips for Installing and Maintaining Your Liquid Cooling System
Installation:
- Follow the manufacturer’s guide carefully to avoid mistakes during setup.
- Ensure all connections are secure but not over-tightened, as this could crack components.
- Test for leaks before powering up your system. Many builders “wet test” custom loops with distilled water for 24 hours before adding coolant.
Maintenance:
- Check fluid levels every few months for custom loops and top off the coolant as needed.
- Flush and replace the coolant annually to prevent clogs and corrosion.
- Clean radiators and fans with compressed air to maintain airflow efficiency.