How much time do you waste every day dragging, resizing, and minimizing windows just to copy info from one app to another? It is the digital equivalent of working on a desk the size of a sticky note. You might think a proper, professional multi-screen setup is a luxury reserved for software engineers with deep pockets. But that is simply not true. You can build a spacious, highly efficient dual-monitor workstation today for less than $300.
So what does this actually mean for your daily routine? A landmark study by Jon Peddie Research found that adding a second monitor increases overall productivity by an average of 42%. Another study by Wichita State University showed that dual-screen users are 18% more efficient at finding and comparing information. In fact, 98% of users in a University of Utah study expressed a strong preference for dual screens over a single monitor.
We are not talking about cheap, blurry screens that will give you a headache by noon. With some smart shopping and strategic planning, you can get crisp displays, excellent ergonomics, and a clean desk.
Why You Need a Dual-Monitor Setup (Without Breaking the Bank)
Getting more screen space is not just about making your desk look cool. It fundamentally changes how you work. Imagine having your email, team chat, or reference documents open on one screen while you write, design, or code on the other. No more constant tab-switching or losing your train of thought.
Many people assume they need to spend $1,000 or more on high-end displays to get a good experience. The truth is that display technology has matured incredibly fast. High-quality panels that used to cost a fortune are now available at entry-level prices.
To make this work on a budget, you just need to set realistic expectations. You will not be buying 4K color-grading monitors or giant curved gaming panels. Instead, you will target highly reliable 1080p displays that offer sharp text, accurate colors, and excellent viewing angles.
The Strategic Shopping List for Sourcing Hardware on a Budget
How do you stretch $300 to cover two screens, a mount, and cables? It is all about smart allocation. Instead of buying the first shiny display you see, you need a plan.
Let's break down the math
• Primary Monitor: $80 to $95
• Secondary Monitor: $80 to $95
• Dual Monitor Arm: $30 to $40
• Cables and Adapters: $15 to $30
• Buffer and Taxes: $40 to $50
This brings your total to around $245 to $290, which is comfortably under our $300 limit.
When you are shopping, look for three key features. First, you want IPS panels. Cheap TN or VA panels suffer from color shift and look washed out when viewed from the side. Since at least one of your monitors will be sitting at an angle, IPS panels are important because they offer 178-degree viewing angles. Second, look for thin bezels so the gap between your screens is as small as possible. Third, make sure they have VESA mounting holes on the back (either 75x75mm or 100x100mm) so you can mount them to an arm.
Here is a golden rule: buy identical monitors. Even if two different models are both 24-inch 1080p displays, they will have different color profiles, brightness levels, and physical heights. Having mismatched screens causes eye strain as your eyes constantly try to adjust to different displays.
Top Recommendations
• KOORUI E2412F: This 24-inch 1080p monitor is a budget favorite.¹ It has an IPS panel, a smooth 100Hz refresh rate, ultra-thin bezels, and 75x75mm VESA compatibility.
• Dell SE2425HM: If you prefer a household brand, this 23.8-inch display is a highly reliable option.³ It has a color-accurate IPS panel, a 100Hz refresh rate, and Dell ComfortView Plus to reduce blue light during long workdays.
• AOC 24G15N: Although this one uses a VA panel (which has narrower viewing angles than IPS), it has deep contrast ratios that are perfect for dark mode users, along with a high 180Hz refresh rate.²
Step-by-Step Physical Assembly
Once your gear arrives, it is time for the fun part. Do not just plop the monitors on your desk using the cheap plastic stands that come in the box. Using a dual-monitor desk clamp lifts the monitors off your desk, instantly freeing up valuable workspace.⁴
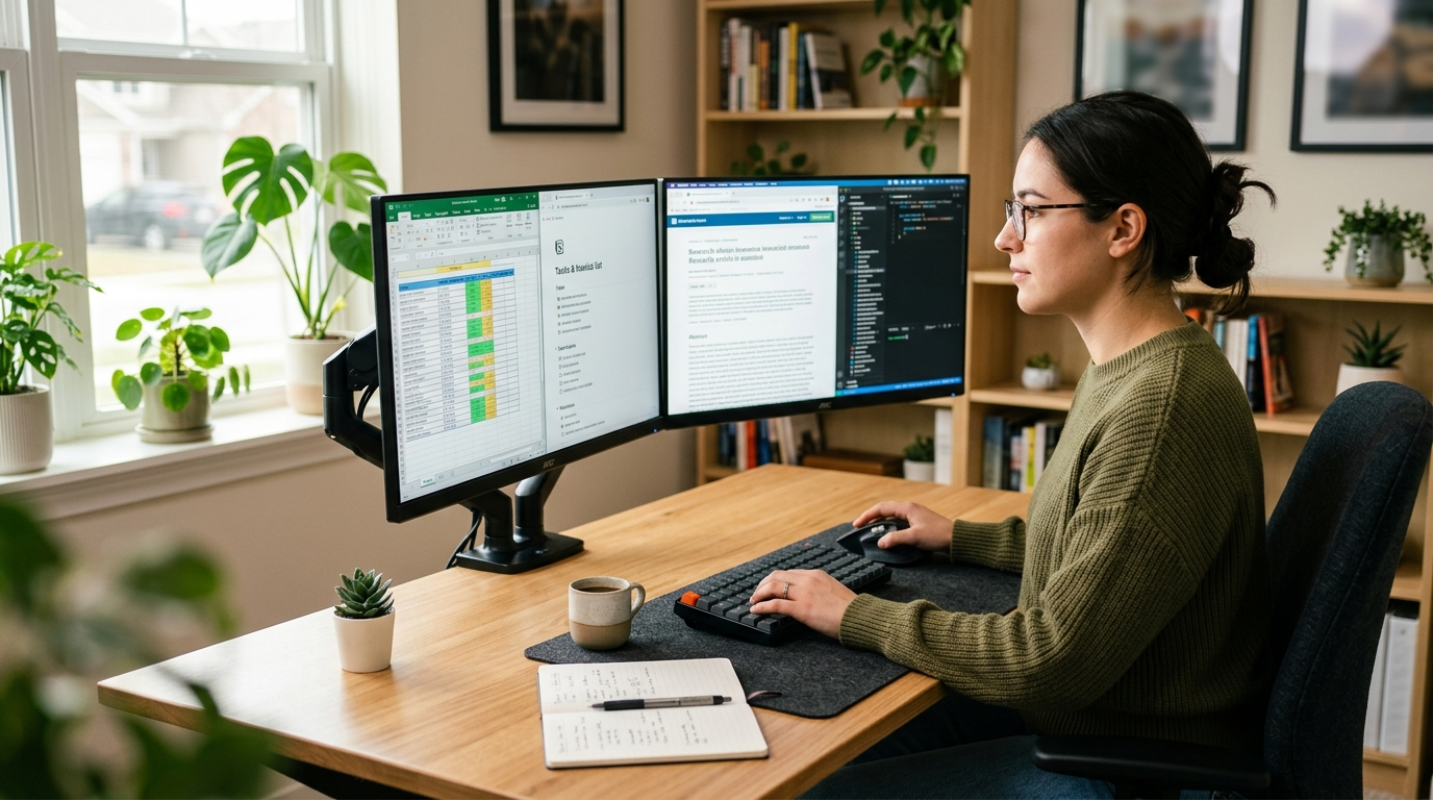
Start by clamping the monitor arm to the back-center of your desk. Make sure the clamp is tight and secure. Next, unscrew the factory stands from your monitors and attach the VESA plates to the back of each screen. Carefully slide the monitors onto the arm brackets and tighten the security screws.
For the best ergonomics, the top of your screens should be at or slightly below eye level. You should not have to tilt your head up or down to read. Position your primary monitor directly in front of you, and place the secondary monitor immediately next to it, angled slightly inward toward your face.
Now, let's talk about cable management. Messy cables can make even the most expensive setup look cheap. Use the cable clips built into your monitor arm to route the power and display cables down the main pole. You can use simple zip ties or velcro straps to bundle the cables together underneath your desk.
Software Configuration and Display Settings
With everything plugged in, you might run into the infamous "One HDMI Port" laptop trap. Most budget laptops only have a single HDMI port. Do not buy a cheap $10 HDMI splitter, because splitters only mirror your screen, meaning you will see the exact same image on both monitors.
If your laptop has a USB-C port that supports DisplayPort Alt Mode, buy a USB-C to Dual HDMI MST Hub for around $20 to $30. This lets you run two independent, extended displays from that single port. If your laptop only has standard USB-A ports, you will need a USB 3.0 to Dual HDMI Adapter that uses DisplayLink drivers. This acts as an external graphics card to send video signals to both screens.
Once connected, you need to configure your operating system. On Windows, right-click your desktop and select Display Settings. Scroll down to Multiple Displays and choose "Extend these displays." On macOS, go to System Settings, click Displays, and arrange your screens so your mouse moves naturally from one to the other.
Make sure to match the resolution and refresh rates for both screens. If one monitor is running at 60Hz and the other at 100Hz, dragging windows between them will feel jarring. Set both to their highest matching refresh rate in your system display settings.
Final Pro-Tips for Your Budget Dual Monitor Workstation
Even if you bought identical monitors, they might look slightly different out of the box due to factory calibration variances. To fix this, open the physical on-screen display menu on each monitor and set them to the same color profile (usually "Warm" or "sRGB"). You can manually adjust the brightness and contrast levels side-by-side until the white backgrounds on both screens match perfectly.
To handle your new digital real estate efficiently, you should master a few quick keyboard shortcuts. On Windows, hold the Windows key and press the Left or Right Arrow keys to instantly snap windows to the sides of your screens. On macOS, you can use built-in window management tools or install a free app like Rectangle to quickly organize your workspace.
Lastly, keep your budget gear in top shape by keeping it clean and cool. Avoid blocking the ventilation grates on the back of your monitors, and wipe the screens down with a dry microfiber cloth instead of harsh chemical cleaners. Taking care of your setup makes sure your budget-friendly workstation will keep you productive for years to come.
Sources:
1. Reddit r/buildapc - Looking for a cheap monitor below 100 dollars
https://www.reddit.com/r/buildapc/comments/1n615qg/looking_for_a_cheap_monitor_below_100_dollars_do/
2. DisplayNinja - Best Gaming Monitor Under 100
https://www.displayninja.com/best-gaming-monitor-under-100/
3. DisplayNinja - Dell SE2425HM Review
https://www.displayninja.com/dell-se2425hm-review/
4. Reddit r/StandingDesksLife - Best dual monitor arm recommendations
https://www.reddit.com/r/StandingDesksLife/comments/1r34vzw/best_dual_monitor_arm_recommendations/


.jpg)